Air Conditioner and Heating Repair: A Practical Home Guide
Learn practical, step-by-step methods for diagnosing and fixing common air conditioner and heating repair issues. Get safety tips, maintenance routines, and guidance on when to call a professional. Brought to you by Air Conditioner Service.

By following this guide, you will learn practical steps to diagnose and fix common issues in air conditioner and heating repair, identify when components need cleaning or replacement, and safely decide when to attempt DIY fixes or call a professional. Use the checklists, step-by-step instructions, and safety tips to protect your system and your household while extending equipment life.
What you gain from understanding air conditioner and heating repair
Understanding the basics of air conditioner and heating repair helps homeowners and renters act quickly, safely, and cost-effectively. When you know how a system should behave, you can recognize abnormal noises, poor airflow, or uneven temperatures long before a minor issue becomes a major breakdown. This knowledge also makes it easier to communicate with technicians, understand the scope of repairs, and compare quotes with confidence. According to Air Conditioner Service, proactive maintenance and early symptom recognition save time and money by reducing downtime and preventing avoidable damage. Throughout this guide, we’ll cover practical checks you can perform safely, plus clear indicators for when professional intervention is warranted. The goal is to empower you to protect your home comfort without compromising safety or warranty coverage.
Core components to inspect in air conditioners and heating systems
A typical split-system air conditioner and a central heating setup share several key components. The compressor circulates refrigerant, the outdoor condenser releases heat, the evaporator handles heat absorption inside, and the blower distributes air. The thermostat governs temperature, while electrical connections and capacitors support motor startup. For heating, you’ll encounter burners or heat exchangers in gas or oil furnaces, along with ignition systems. Regular checks focus on airflow, coil cleanliness, refrigerant lines for leaks, and safe power supply. Keeping these elements clean and intact reduces the likelihood of sudden failures and improves efficiency. Remember, any diagnostics involving electrical components should be performed with power off and with appropriate safety gear. This section lays the foundation for understanding how a malfunction manifests and which parts are most often involved in repairs.
Safe diagnostic steps you can perform before calling a technician
Safety first: never work on live electrical components. Start by turning off the equipment at the breaker or disconnect switch and confirm with a non-contact voltage tester. Check the thermostat settings, then inspect the outdoor unit for debris, obstructions, and visible signs of damage. Inspect air filters and ducts for blockages that restrict airflow, which is a very common reason for reduced cooling or heating efficiency. Listen for unusual sounds and note when symptoms occur—midday heat, full-load operation, or after cycling on and off. Document any error codes displayed on the thermostat or air handler, as these can guide a technician toward the likely causes. If you see signs of burning, a buzzing sound, or strong electrical smells, shut the unit down and call a professional immediately.
Step-by-step troubleshooting for not cooling
Not cooling is one of the most common repair triggers. Start by confirming power, thermostat settings, and airflow. Clean or replace the air filter, then check for frost or ice on the refrigerant lines which can indicate a refrigerant issue or airflow restriction. Inspect the outdoor unit’s condenser coils; if dirty, carefully vacuum or rinse with a gentle stream of water and ensure fins are unobstructed. Examine the condensate drain for clogs, which can reduce efficiency and trigger safety switches. If the problem persists after these checks, it’s time to involve a professional who can test refrigerant pressures safely and diagnose compressor or refrigerant-related faults.
Thermostat and power supply checks
A reliable thermostat is essential for consistent comfort. Ensure the thermostat is correctly wired, set to the desired mode (cooling or heating), and calibrated. If you use a programmable thermostat, verify schedules and battery life. Check the power supply to the air handler or furnace: look for tripped breakers, blown fuses, or loose wiring at the disconnect box. A failing contactor or capacitor can prevent the compressor from starting, so listen for humming without startup. Always disconnect power before inspecting electrical components, and use a multimeter to verify voltage where you’re qualified to do so. Correct wiring and clean connections help prevent nuisance shutdowns and improve overall performance.
Cleaning, filters, and airflow improvements
Airflow is the lifeblood of comfort. Replace disposable filters regularly or wash reusable ones according to the manufacturer’s guidance. Clean the return and supply ducts where accessible to prevent dust buildup that reduces efficiency. In the outdoor unit, remove leaves, grass, or mulch that restricts air intake, and gently clean the condenser fins with a soft brush or hose on a gentle setting. Ensure there are no obstructions within at least 3 feet of the outdoor unit. Proper airflow reduces stress on compressors, improves heat exchange, and lowers energy consumption. If you notice persistent reduced airflow, consider a professional duct cleaning assessment to address deeper airflow constraints.
Common heating system repair basics
Heating systems—especially furnaces—present additional complexities. Gas furnaces require careful handling of gas lines, ignition systems, and flue connections. For oil furnaces, burner maintenance and fuel quality matter. Basic checks include ensuring the air filter is clean, confirming the blower motor runs smoothly, and inspecting ignitors or spark electrodes for proper function. If the system struggles to ignite, or the flame appears yellow instead of blue, do not attempt risky retries. Instead, call a licensed technician to diagnose burner adjustments, venting, and safety controls. Regular maintenance helps prevent carbon monoxide risks and keeps your home warm reliably.
When DIY ends and professional service begins
Some problems are straightforward, but others demand professional expertise. If you notice refrigerant smells, oily residues around lines, buzzing noises with no startup, or repeated system cycling without legitimate diagnosis, it’s time to book a service call. Electrical faults, gas connections, and high-volt components require trained handling and specialized tools. Keep a detailed log of symptoms, timestamps, and any DIY attempts to share with your technician. For older units, weigh the cost of frequent repairs against the benefits of a proactive replacement plan. Prioritizing safety and system longevity helps avoid risky DIY missteps.
Maintenance patterns that prevent major repairs
Prevention is the best form of repair for both air conditioners and heating systems. Schedule annual checkups, replace filters on schedule, and clean coils as advised by the manufacturer. Keep an eye on refrigerant levels, especially in heat pump configurations, and address airflow obstructions promptly. Document any unusual sounds, odors, or performance changes. A simple maintenance routine can extend the life of components, sustain efficiency, and minimize the frequency of costly emergency repairs. By investing time in routine care, you reduce the odds of major breakdowns during peak seasons.
Quick-start checklist for a home repair day
Before you begin: gather your tools, turn off power, and wear safety gear. Start by inspecting the thermostat, breaker panel, and outdoor unit clearance. Next, replace or clean filters, check airflow, and inspect for visible leaks or corrosion. If you encounter unfamiliar components, stop and consult the troubleshooting guide or a professional. End by recording what you found and scheduling professional evaluation if symptoms persist. This structured approach keeps repairs manageable and improves your odds of a successful DIY outcome.
Tools & Materials
- Safety gloves (nitrile or leather)(Non-slip grip and heat resistance; use when handling sharp edges or hot components.)
- Non-contact voltage tester(Check for live circuits before touching electrical parts.)
- Screwdriver set (Phillips and flathead)(Phillips #2 is commonly used for electrical panels and covers.)
- Multimeter(Useful for checking voltage, continuity, and resistance in wiring and components.)
- Vacuum with brush attachment(For cleaning dust from coils and filters without spraying water.)
- Soft brush and water spray bottle(Use gently on condenser fins; avoid high-pressure water.)
- Replacing filters(Choose the correct MERV rating and size for your system.)
- Torch or flashlight(Inspect dark corners and connections safely.)
Steps
Estimated time: 60-90 minutes
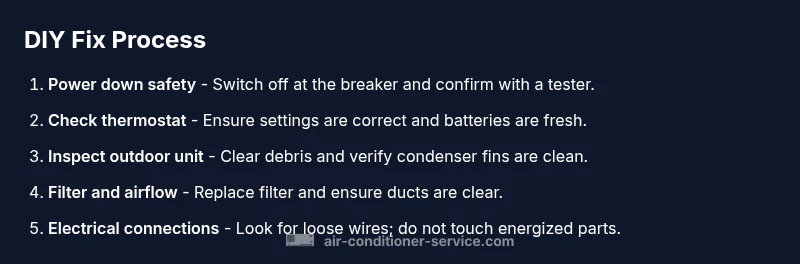
- 1
Power down and confirm safety
Locate the service disconnect and the main breaker, switch off power to the equipment, and verify with a non-contact tester before touching any components. This prevents electrical shock and accidental starts during inspection.
Tip: Always treat any exposed wiring as live until proven safe with a tester. - 2
Check thermostat and mode settings
Verify the thermostat is set to the correct mode and temperature. If you’re using a programmable unit, confirm that schedules are active and the batteries are fresh. Incorrect settings can mimic a faulty system.
Tip: Reset to a known-good baseline after adjustments to confirm behavior. - 3
Inspect outdoor unit clearance
Clear debris and ensure at least 3 feet of clearance around the condenser. Inspect fins for damage and straighten them carefully with a soft brush. Reduced airflow is a common cause of inefficiency and failure.
Tip: Do not knock fins with force; use gentle taps to avoid bending. - 4
Replace or clean the air filters
Remove the filter, inspect for dirt, and replace with a correctly sized filter. Dirty filters reduce airflow, forcing the system to work harder and increasing energy use. If reusable, wash as directed and ensure complete dry before reinstalling.
Tip: Mark the date on the new filter to track replacement intervals. - 5
Check electrical connections
Inspect accessible wiring and contactors for signs of wear or loose connections. Tighten screws as needed and look for burn marks or melted insulation. If you’re unsure about readings, stop and call a pro rather than guessing.
Tip: Never probe live wires with metal tools; use insulated tools and proper PPE. - 6
Look for refrigerant issues
Observe for frost on evaporator lines or oily residues near fittings, which can indicate leaks. Do not attempt to recharge refrigerant yourself; handling refrigerants requires licensing and equipment. Document any signs to share with a technician.
Tip: If you suspect a leak, prioritize professional assessment for safety and compliance. - 7
Test ignition and burner function (heating)
For gas or oil furnaces, verify ignition and flame color. A yellow or flickering flame can signal incomplete combustion or dirty burners. Do not attempt major burner work without training; call a professional.
Tip: Keep the area ventilated and clear of flammable materials during inspection. - 8
Evaluate overall performance and plan next steps
Run the system for a complete cycle and compare performance against normal behavior documented in your manual. If issues persist after these checks, schedule a professional diagnostic visit. Keep records of symptoms, times, and actions taken.
Tip: A well-documented history speeds up diagnosis and reduces diagnostic costs.
Common Questions
What are the most common signs that my AC or heater needs repair?
Not cooling or heating adequately, unusual noises,冰 odours, and increasing energy bills are typical signs. If symptoms persist after basic checks, schedule a professional evaluation to avoid further damage.
Common signs include poor performance, strange sounds, and rising energy bills. If symptoms persist after basic checks, seek a professional evaluation.
Can I fix refrigerant leaks myself?
No. Refrigerant work requires licensed technicians and improper handling can be dangerous and illegal. Do not attempt to seal or recharge refrigerant yourself.
No—refrigerant work should be done by a licensed professional due to safety and legal reasons.
Is it cheaper to repair or replace my unit?
It depends on the unit’s age, repair cost, and expected remaining life. A technician can provide a detailed estimate comparing options and long-term value.
It depends on age, cost, and expected remaining life; a professional can help you decide.
How long does a typical DIY repair take?
Most basic checks and maintenance take a few hours, depending on access and familiarity with the system. Complex repairs may require more time or a professional visit.
A few hours for basic tasks; more complex issues may need a pro and longer time.
Do I need special tools for home repairs?
A basic toolkit plus some HVAC-specific tools (tester, multimeter) is helpful. Follow the guide for item-specific needs and safety tips.
Yes, a few common tools and safety gear will help, but follow the guide for specifics.
When should I call for emergency repair?
If you smell gas, hear hissing near gas lines, or suspect a dangerous electrical issue, shut off power and call emergency services or a licensed technician immediately.
If you smell gas or hear dangerous sounds, shut off power and call for emergency help right away.
Watch Video
The Essentials
- Identify symptoms early to guide repairs.
- Shut power before servicing to stay safe.
- Differentiate DIY tasks from problems needing a pro.
- Regular maintenance lowers cost and extends life.
- Document findings to inform a pro visit.