How to Clean Air Conditioner Evaporator Coils: A Practical Guide
Learn how to safely clean evaporator coils to restore airflow and efficiency. This step-by-step guide covers tools, methods, safety, and maintenance for homeowners and renters.

Cleaning evaporator coils in your air conditioner restores airflow, improves cooling efficiency, and reduces energy use. Start by turning off power, opening the access panel, and inspecting for debris. Use a coil-safe cleaner or a gentle brush, rinse with low-pressure water, and let the coils dry completely before reassembling. This is a safe, practical DIY task for accessible coils.
Why evaporator coils get dirty and why cleaning matters
According to Air Conditioner Service, dirt and dust that accumulate in indoor spaces mix with humidity to form a grime film on the evaporator coils. When the coils are coated, heat exchange suffers, reducing cooling efficiency and increasing energy use. This guide focuses on the cleaning air conditioner evaporator coils as a maintenance practice that can restore airflow, improve dehumidification, and extend the life of the system. Homeowners and renters can perform careful, non-destructive cleaning, provided they follow safety steps and use appropriate tools. Regular cleaning prevents ice buildup on the coil and protects the refrigerant circuit from debris that can block airflow. The result is more consistent temperatures and lower monthly bills, especially in dusty homes or climates with high humidity.
When you should clean vs when to call a pro
Not every coil requires the same level of attention. Visible dust and a noticeable drop in cooling effectiveness are common signs that the evaporator coils benefit from cleaning. If you see refrigerant leaks, frosting, or a severe clog, call a licensed professional. Air Conditioner Service recommends basic DIY cleaning for accessible, non-ice-covered coils in standard residential units. For complex evaporator coil configurations or suspicious refrigerant issues, professional service is safer and yields better results.
Safety precautions before you begin
Safety is the foundation of any coil-cleaning project. Always power down the system at the thermostat and switch off the circuit breaker feeding the AC. Use a non-conductive cleaner and wear protective gloves and safety glasses. Keep children and pets away from the workspace, and avoid leaning over the indoor unit's fins. If you smell gas, hear buzzing, or notice burnt components, stop and call a pro. An initial visual check for damaged wiring and loose components helps prevent accidents during cleaning.
Cleaning methods: chemical cleaners vs. non-chemical options
There are multiple paths to clean evaporator coils. Chemical coil cleaners are effective at dissolving grime but must be applied according to the label and kept away from metal surfaces that could corrode. Alternative methods include vacuuming loose debris, brushing with a soft coil brush, and using a mild detergent solution with a low-pressure rinse. Regardless of method, avoid high-pressure water directly on the fins, which can bend metal and reduce heat transfer efficiency.
Preparing your workspace and protecting components
Clear the area around the indoor air handler and lay down towels to catch drips. Remove the access panel and inspect the coil carefully. If possible, take a photo of the coil before you start to guide reassembly. Keep a container handy for collecting dirty water, and position a fan to aid drying after rinsing. Protect nearby electrical components with plastic sheeting if accessible.
Understanding coil cleaning frequency and environmental factors
Frequency depends on dust levels, pets, and humidity. In homes with heavy dust or smokers, coils may require cleaning more frequently. If you see a lot of dust buildup, plan coil maintenance every 6-12 months. For otherwise clean homes, annual inspection and cleaning may suffice. The goal is to maintain heat transfer and airflow without forcing unnecessary disassembly.
Aftercare: testing airflow and system performance
After cleaning and reassembling, restore power and run the unit on cool. Check the vents for a strong, steady airflow and listen for unusual noises. If temperatures remain inconsistent or you notice frost on the coil, allow the unit to rest and recheck later. A quick comparison of indoor air temperature before and after cleaning helps gauge effectiveness.
Troubleshooting common issues during cleaning
Ice on the coil, refrigerant smells, or water leaks require immediate action. Avoid forcing a thaw with heat; ice indicates possible low refrigerant or restricted airflow. Bent fins may reduce effectiveness; straighten with a nylon comb. If the unit still underperforms after cleaning, the problem may lie in the outdoor condenser, ductwork, or refrigerant charge, which warrants a professional assessment.
Maintenance tips and long-term care to prevent buildup
To keep coils clean longer, replace or clean air filters regularly, seal air leaks, and keep the surrounding area dust-free. Consider scheduling seasonal maintenance with a licensed technician. A small investment in preventive care can reduce energy use, extend equipment life, and minimize unexpected repairs.
Tools & Materials
- Protective gloves (nitrile)(protect hands from cleaners and sharp fins)
- Safety glasses(eye protection)
- Soft brush or coil brush(non-abrasive to avoid coil damage)
- Vacuum with brush attachment(helps remove loose debris)
- AC coil cleaner spray(follow label directions)
- Mild dish soap (optional)(for stubborn grime, diluted)
- Low-pressure rinse source (garden hose or spray bottle)(avoid high pressure)
- Towels or lint-free cloths(drying and blotting)
- Ladder or step stool(to reach unit safely)
- Non-contact voltage tester(verify power off)
Steps
Estimated time: 45-90 minutes
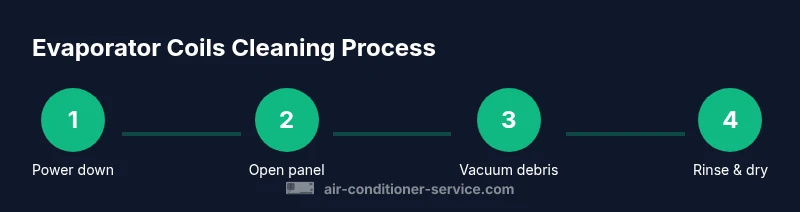
- 1
Power down and secure the unit
Turn off the thermostat and switch off the AC circuit breaker. If available, use a non-contact tester to confirm no power reaches the indoor unit. This prevents shocks and protects electronics during cleaning.
Tip: Always verify power before touching any internal components. - 2
Open the access panel and locate the coil
Remove the cover to expose the evaporator coil. Use a flashlight to inspect for heavy dirt, ice, or damage that could worsen cleaning difficulty or indicate a pre-existing issue.
Tip: Take a photo of the coil layout to aid reassembly. - 3
Vacuum loose debris from the coil
Gently vacuum the coil surface using a brush attachment at low suction. Work from the interior to the exterior, keeping the nozzle moving to avoid bending the fins.
Tip: Use slow, light strokes to prevent bending fins. - 4
Apply coil cleaner and dwell time
Apply the cleaner evenly following the label directions. Allow the solution to dwell for the recommended time to break down grime without harming the coil.
Tip: Do not spray on electrical components. - 5
Rinse with low-pressure water
Rinse the coil from the inside outward using a gentle, low-pressure spray. Avoid high-pressure jets that can bend the fins or force cleaner into connections.
Tip: Keep the nozzle at a safe distance and move constantly. - 6
Dry the coil and surrounding area
Blot excess moisture with towels and allow the coil to dry completely before reassembly. A warm, dry environment speeds up drying but avoid direct heat.
Tip: Do not use high heat to dry the coil. - 7
Reassemble and restore power
Replace the access panel, secure all screws, and turn the breaker back on. Then restore power at the thermostat and listen for normal fan operation.
Tip: If you hear buzzing or smell burning, shut off power and call a pro. - 8
Test airflow and cooling performance
Set the AC to cool and check the airflow from vents. Compare the temperature drop before and after cleaning to gauge improvement.
Tip: Allow system to run 5-10 minutes before evaluating. - 9
Document maintenance and schedule next cleaning
Record the cleaning date, any observations, and set a reminder for 6-24 months based on environment.
Tip: Environment and usage dictate frequency more than calendar time.
Common Questions
Is it safe to clean evaporator coils myself?
DIY cleaning can be safe when you follow safety steps: power off, use proper cleaners, and avoid damaged components. If you’re unsure, hire a pro.
Yes, you can, but make sure to power off and follow safety steps.
What cleaner should I use on evaporator coils?
Use a coil cleaner intended for air conditioners, following the label directions. Mild detergents can work on very dirty coils but avoid harsh solvents.
Use a coil cleaner designed for AC units and follow the label.
How often should evaporator coils be cleaned?
Frequency depends on environment. In dusty or humid homes, every 6-12 months; otherwise, annual checks are commonly sufficient.
It depends on dust and humidity; many homes clean yearly.
Can cleaning evaporator coils improve efficiency immediately?
You may notice improved airflow and cooling after cleaning, but gains depend on overall system condition and ductwork.
You might see faster cooling after cleaning, depending on other factors.
What if cleaning doesn’t improve performance?
Possible causes include refrigerant issues, bent fins, or duct leaks. If problems persist, have a professional diagnose the system.
If there’s no improvement, a pro should check refrigerant and leaks.
Should I clean both evaporator and condenser coils?
Yes, cleaning the indoor evaporator coils helps, and the outdoor condenser coils should be cleaned periodically as well. Handle with care near electrical components.
Clean both indoors and outdoors when needed, but be careful.
Watch Video
The Essentials
- Inspect coils before cleaning; avoid damage to fins.
- Use non-abrasive tools and low-pressure rinse only.
- Dry thoroughly before reassembly to prevent mold.
- Regular maintenance reduces energy waste and extends life.