Do Air Conditioners Leak Water? A Practical Troubleshooting Guide
Learn why do air conditioners leak water, how to diagnose the cause, and follow a safe, step-by-step fix. Air Conditioner Service guides homeowners and renters through condensate drains, pans, and common leaks to restore cooling efficiently.

Air conditioners leaking water is usually caused by a clogged condensate drain, a frozen evaporator coil, or improper drainage. Start with the simplest checks: look for a blocked condensate line, empty the drain pan, and ensure the condensate hose runs to a safe exterior drain. If the leak persists, shut off power and call a pro.
Do air conditioners leak water? Common causes and practical context
Water leakage from an air conditioner is more common than many homeowners expect, especially during peak cooling season. The most frequent culprits are condensate drainage problems, including a clogged condensate line or an overflowing drain pan. In humid climates, heavy moisture can overwhelm your system if airflow is restricted or the filter is dirty. A frozen evaporator coil can also cause a temporary water discharge when it thaws, leading to unexpected runoff from the indoor unit. In all cases, addressing the root cause quickly helps prevent water damage and reduces the risk of mold growth. The question do air conditioners leak water is not a sign of a failing compressor; it usually points to drainage or airflow issues that are solvable with routine maintenance and careful troubleshooting.
Quick checks you can perform safely
Before you reach for tools, perform a few safe, non-invasive checks. Start with the simplest items: ensure the unit is level, since an improper tilt can direct condensate water in unintended directions. Check the air filter and replace it if dirty, since restricted airflow can cause coil icing and later meltwater leaks. Inspect the condensate drain line for visible clogs or kinks. If you see standing water near the indoor unit or a soggy drain pan, note the location and level of water as a clue for diagnosis. Always turn off power at the breaker before inspecting electrical components. If you cannot access the drain line safely, avoid forcing anything and call a professional.
Diagnosing the leak: symptom to cause mapping
A puddle under the indoor unit usually points to drainage issues rather than a refrigerant leak. Common symptoms include a steady drip from the condensate line, water around the pan, or water appearing after the unit stops. When you notice ice on the coil or frost on the evaporator, the issue is typically restricted airflow or a freezing cycle that later melts. A musty odor with moisture suggests mold growth from persistent dampness. By mapping symptoms to likely causes (drain line, pan, coil freezing, or installation problems), you can prioritize fixes safely. Remember, do air conditioners leak water often indicates a drainage or airflow problem rather than a defective compressor.
Step-by-step fix for the most common cause: clear the condensate drain
The most frequent fix is clearing a clogged condensate drain. Start by turning off the unit and locating the condensate line. Use a wet/dry vacuum to suck out the line from the connection point, being careful not to pull the line loose. If the line is accessible, gently unplug or loosen the cap to allow built-up sludge to drain out. Rinse with water or a mild vinegar solution to reduce future clogs, then reassemble the line and test with a small amount of water. Finally, inspect the drain pan and check the float switch if present. A functioning float switch prevents overflows by shutting off the unit when water level is too high. If you don’t observe drainage after clearing, there may be a kink or a slope issue that requires repositioning or professional help.
Safety, warnings, and best practices when working with condensate leaks
Safety always comes first. Do not work near electrical components without turning off power at the breaker and the disconnect switch near the outdoor unit. Never pour caustic cleaners into the condensate line or pan, as this can damage plastic components or the environment. If you suspect a refrigerant issue or there is visible damage to wiring, stop and call a licensed technician. Regular maintenance matters: replace filters every 1-3 months during heavy use, and schedule annual checkups to prevent recurring drainage problems. By staying proactive, you reduce the chances of leaks and extend the life of your system.
Maintenance tips to prevent future leaks
Preventing leaks starts with simple, consistent maintenance. Clean or replace air filters monthly during peak season to maintain good airflow. Keep the outdoor unit free of debris and ensure it has adequate clearance for drainage. Inspect the condensate line for cracks or leaks and replace damaged sections promptly. If your home has a history of high humidity, consider upgrading the drain line capacity or adding a condensate pump if gravity drainage isn’t feasible. Lastly, ensure the unit is level and that the refrigerant charge is correct—both affect frost formation and drainage efficiency. By incorporating these steps into your routine, you minimize the chance of future leaks.
Cost considerations and practical expectations
Repair costs for water leaks depend on the root cause and whether you need a technician. For a clogged condensate line cleared by a DIY approach, expect minimal cost beyond basic tools or cleaners. If a faulty float switch, cracked drain pan, or misalignment requires replacement or professional service, plan for mid-range costs that reflect parts and labor. While you can often resolve minor drainage issues on your own, more complex problems—like refrigerant-related concerns or a refrigerant line repair—require a licensed HVAC technician. Always obtain a written estimate before any work and ensure the scope includes testing after the fix so you can confirm the leak is resolved. Remember, ongoing maintenance is the best defense against leaks.
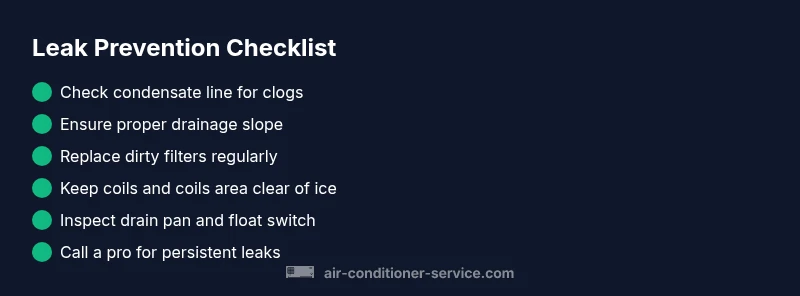
Quick-reference checklist for do it yourself troubleshooting
- Check for a clogged condensate line and clear it if possible.
- Inspect the drain pan and ensure the float switch operates correctly.
- Verify the unit is level and airflow is unobstructed by a dirty filter.
- Look for ice on the evaporator coils; thaw and improve airflow.
- Confirm proper drainage slope from indoor to outdoor drain.
- If water continues to drip after these steps, call a professional for a full diagnostic.
FAQs and misconceptions at a glance
- Do air conditioners leak water? Yes, primarily due to drainage or airflow problems, not normal operation.
- Is a little water normal? A small amount around the drain pan after a cycle can be normal, but persistent drips indicate an issue.
- Can faulty installation cause leaks? Yes, improper tilt or drainage setup can lead to leaks.
- When should I get professional help? If you cannot locate or fix the issue safely, or if the leak recurs after DIY fixes, contact a licensed technician.
Steps
Estimated time: 60-90 minutes
- 1
Power down the system
Turn off the thermostat and switch off the outdoor disconnect. Unplug any nearby power sources and ensure the area is dry before handling components.
Tip: Always lock out the circuit to prevent accidental energizing. - 2
Inspect the condensate line
Trace the line from the evaporator to the drain. Look for clogs, kinks, or disconnections. Use a vacuum or flexible snake to clear blockages. Rinse with water if possible.
Tip: Do not use excessive force; if the line is damaged, stop and call a pro. - 3
Check the drain pan and float switch
Examine the pan for cracks or overflowing water. If a float switch exists, test that it stops the unit when water rises. Replace faulty parts as needed.
Tip: A faulty float switch may prevent proper shutdown and cause overflow. - 4
Assess coil condition and airflow
Look for ice buildup on the evaporator coil and check the air filter. Clean or replace the filter to restore airflow; thaw ice if present and recheck after cycling.
Tip: Restricted airflow is a common root cause of leaks. - 5
Ensure proper drainage slope and level
Make sure the indoor unit is level and that the drain line slopes downward toward the exterior. Correct any tilt issues to prevent water from pooling.
Tip: Even small tilts affect drainage over time. - 6
Test run and monitor
Restore power and run the system for a full cycle while watching the drainage. Listen for unusual dripping and check for new leaks.
Tip: Keep a moisture meter handy to confirm dryness after the fix.
Diagnosis: Water leaking from indoor AC unit or puddles under the unit
Possible Causes
- highClogged condensate drain line
- highOverflowing condensate pan or faulty float switch
- mediumFrozen evaporator coil due to restricted airflow or low refrigerant
- lowImproper installation causing poor drainage
Fixes
- easyUnclog the condensate drain line using a wet/dry vacuum or a drain snake; flush with water
- easyInspect and empty the condensate pan; replace faulty float switch if needed
- easyThaw evaporator coil if ice is present; replace air filter and improve airflow
- mediumVerify unit tilt and drainage paths; correct installation if necessary
Common Questions
What causes water to leak from an air conditioner?
Most leaks come from drainage problems, such as a clogged condensate line or overflowing pan. Ice on the coil and poor airflow can also contribute after thawing. These issues are typically fixable with basic maintenance or DIY steps.
Leaks usually come from drainage or airflow problems and can be fixed with simple maintenance.
Is a little water normal after the unit runs?
A small amount around the drain pan after a cycle can be normal, especially in humid weather. Persistent dripping requires checking the line and pan for clogs or misalignment.
A small amount can be normal, but ongoing drips mean you should check drainage.
Can a dirty filter cause leaks?
Yes. A dirty filter restricts airflow, causing coils to ice over and melt, which can appear as water leakage. Replace or clean the filter and monitor.
A dirty filter can lead to ice on the coil and water from melting ice.
When should I call a professional?
If you cannot identify the source of the leak, if the leak recurs after DIY fixes, or if you suspect refrigerant or electrical issues, contact a licensed HVAC technician.
Call a pro if you’re unsure or if the leak keeps happening.
Can refrigerant leaks cause water puddles?
Refrigerant leaks don’t typically cause water leaks; they cause efficiency loss and possible frost. Water is usually a drainage or humidity issue. If you suspect refrigerant problems, avoid DIY repairs and call a pro.
Water isn’t usually from refrigerant leaks; call a pro for refrigerant issues.
What maintenance prevents leaks long-term?
Regular filter changes, clearing the condensate line, cleaning the pan, and annual professional maintenance greatly reduce leak risk and keep the system efficient.
Regular maintenance helps prevent leaks and keeps the system running smoothly.
The Essentials
- Check condensate line first and clear blockages.
- Boost airflow by replacing dirty filters and removing obstructions.
- Call a pro if leaks persist after DIY fixes.
- Ensure unit is level for proper drainage.
- Maintenance reduces future leaks and cost.