Where to Install Air Conditioner: A Practical Guide
Learn where to install air conditioner for optimal comfort, efficiency, and safety. This comprehensive guide covers indoor and outdoor placement, ducted vs. ductless systems, safety, permits, and maintenance for homeowners and renters.

Where to install an air conditioner mainly affects comfort, energy use, and system longevity. Choose locations with good airflow, minimal direct sun, and easy access for service. Ensure outdoor clearances for the condenser and proper routing for any ducts or power supply. This quick guide highlights the key decisions before you start any installation steps.
Understanding Why Placement Matters
Placement decisions influence how evenly your home cools, how efficiently the system runs, and how often you need service. When air can move freely from the evaporator to treated spaces, temperatures stay steadier with less energy waste. Conversely, blocked returns, sun-exposed outdoor units, or cramped indoor spaces can force the system to work harder, increasing wear and reducing comfort. According to Air Conditioner Service, thoughtful location planning helps extend equipment life and minimizes nuisance repairs. This section explains the core reasons placement matters and sets the stage for practical decisions you can make with confidence.
Basic Rules for AC Installation Location
A solid location respects airflow, accessibility, and safety. Key rules include avoiding direct sunlight on cooling coils, keeping the outdoor unit clear of obstructions, and ensuring returns have free paths to the evaporator. Plan a layout that supports uniform cooling rather than concentrating cold air in one room. Maintain access for maintenance tools and service technicians, and verify that there is a dedicated electrical circuit and a safe, clear condensate drain route. The goal is steady performance, predictable comfort, and minimal energy waste over time.
Indoor Placement: Where the Evaporator Should Go
For central or ductless indoor units, the evaporator needs to be placed where it can efficiently distribute air without creating hot or cold pockets. Common spots are living areas that see steady occupancy and where the ceiling height supports good return air flow. Avoid putting the unit behind furniture, in narrow corridors, or opposite heat-generating appliances. Consider future furniture changes, door swing paths, and potential reflections from windows that could skew temperature readings. A well-placed evaporator supports even cooling, better humidity control, and longer filter life.
Outdoor Unit Placement: Clearances and Noise
The outdoor condenser should breathe. Position it with several inches of clearance on all sides to allow airflow and service access. Place it away from traffic paths, windows, and areas where debris can accumulate. Shade is beneficial but avoid blocking the unit with walls or fences that trap heat. Keep the unit level to reduce vibration and noise, and route refrigerant lines and wiring in neat, code-compliant paths that minimize exposure to weather. A proper outdoor setup reduces noise transfer indoors and improves overall system efficiency.
Window and Portable Options: Where to Install
Window units must fit a suitable opening and be securely mounted with proper brackets or supports. Height should avoid stubbing feet or tripping hazards, and exhaust to the outside should be clear of obstructions. Portable systems require a stable surface and a durable, properly vented exhaust hose routed to an exterior opening. In both cases, ensure electrical outlets are compatible with the unit’s amperage and that cords and cords are out of walking paths. These options offer flexibility for renters or homes without central systems, but require careful sizing and venting to function well.
Ducted vs. Ductless Systems: Space Considerations
Ducted systems rely on an extensive network that travels through walls and ceilings, so placement touches both interior layout and attic or crawlspace access. Ductless (mini-split) units require outdoor condenser space plus indoor air handlers that can be mounted high on walls or recessed. Your choice affects the amount of wall space, the need for ceiling or wall modifications, and the amount of refrigerant piping that must be routed. Plan space accordingly to avoid crowding electrical panels, reducing air pathways, or compromising service access.
Environmental and Energy Efficiency Considerations
Efficient placement complements an efficient unit. Properly sized systems with good airflow minimize energy waste and help maintain comfort with lower operating costs. Consider sun exposure, insulation levels, and the home's cooling load when selecting the system type and location. Energy-star rated models often pair well with correct placement for peak efficiency. Keep filter access clear and maintain regular tune-ups to sustain performance over time.
Safety and Structural Considerations
Electrical safety, structural integrity, and local codes matter. Ensure dedicated circuits, proper electrical connections, and adherence to mounting standards. If installing on a roof or elevated platform, check structural load ratings and fall protection. Permits may be required for certain installations, especially central or rooftop systems. Handling refrigerants or heavy equipment should be left to licensed technicians when required by local regulations.
Common Mistakes and How to Avoid Them
Common pitfalls include placing the outdoor unit in cramped spaces, blocking returns, and ignoring drainage routes. Avoid placing indoor ducts or registers directly under heat sources or in front of doors and windows where drafts occur. Don’t neglect electrical requirements or the need for a stable, level mounting surface. A little planning upfront saves time, reduces call-backs, and yields a more comfortable indoor environment.
Hiring Pros vs DIY: When to Call a Technician
Simple window or portable units may be DIY friendly, but central and ductless installations often involve electrical work, refrigerant handling, and building codes. When in doubt, consult a licensed HVAC technician to determine the best location, verify clearances, and ensure the installation meets safety and efficiency standards. A professional assessment also helps optimize system performance and warranty coverage.
Measuring and Planning: A Step-by-Step Prep
Before installing, take precise measurements of rooms, window openings, and outdoor spaces. Sketch a rough layout showing walls, doors, and furniture, then map airflow paths from the evaporator to treated spaces. Verify electrical capacity, conduit paths, and condensate drainage routes. By documenting the space, you can compare options, estimate installation time, and communicate needs clearly with technicians or sales staff.
Maintenance After Installation: Keeping It Efficient
Post-installation care ensures long-term performance. Establish a regular schedule for filter changes, coil cleaning, and refrigerant checks as advised by the manufacturer. Inspect clearances annually, especially after landscaping changes or home renovations. A clean, well-ventilated system maintains efficiency, reduces energy use, and delivers consistent comfort.
Tools & Materials
- Measuring tape(at least 25 ft to measure room dimensions and window openings)
- Level(2-foot level for mounting surfaces and condensers)
- Screwdriver set(Phillips and flat-head for mounts, panels, and brackets)
- Stud finder(Helpful for wall-mounted indoor units or brackets)
- Safety gear(Gloves and eye protection during mounting and wiring tasks)
- Ladder or step ladder(Access outdoor condensers or attic spaces safely)
- Electrical tester(Verify circuits are de-energized before wiring)
Steps
Estimated time: 2-4 hours
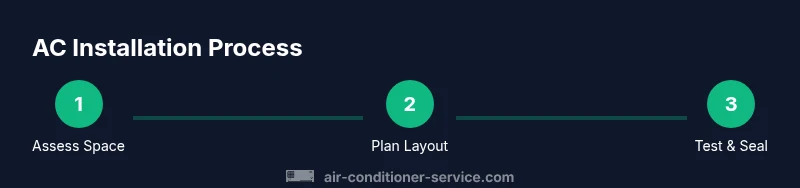
- 1
Assess space and system type
Survey rooms to cool, note existing ductwork, and confirm whether you have a central, ductless, window, or portable unit. Consider occupancy patterns and furniture layout to avoid blocking airflow paths. Establish a baseline of room dimensions and cooling needs.
Tip: Document the largest airflow paths to ensure even cooling across zones. - 2
Check outdoor location and access
Identify a spot with sufficient outdoor clearance, away from doors, windows, and high-traffic areas. Ensure the ground is level and drainage will not pool around the unit. Confirm there is an electrical disconnect nearby for service safety.
Tip: Avoid placing the condenser in direct line of sight to bedrooms if noise is a concern. - 3
Prepare electrical and permits
Confirm the availability of an appropriate circuit or dedicated breaker. If required by local codes, obtain a permit and have a licensed electrician or technician handle disconnects and wiring. This reduces risk and preserves warranty coverage.
Tip: Never modify wiring without turning off the main power and using appropriate protective gear. - 4
Plan indoor mounting location
Choose a spot for the evaporator or air handler that minimizes short-circuiting of airflow and keeps returns unobstructed. Ensure there’s space for service access and filter changes. For window units, measure the opening accurately and ensure structural support.
Tip: Avoid installing behind furniture or heavy curtains that block airflow. - 5
Route ducts and refrigerant lines
Plan neat, code-compliant paths for ducts and refrigerant lines. Use insulated lines where required and protect cords from damage. Keep lines away from sharp edges and ensure there’s no tension that could loosen connections.
Tip: Use protective clamps to reduce vibration and noise. - 6
Test, balance, and seal
After installation, test cooling performance, balance airflow, and seal any gaps around ducts or windows. Check condensate drainage and thermostat calibration. Make final adjustments to maximize efficiency and comfort.
Tip: Run a full system test at different times of day to observe performance under varying conditions.
Common Questions
Where is the best place to install a central air conditioner indoor evaporator?
The evaporator should be placed where it can distribute air evenly, typically in a central area with direct access to returns. Avoid corners, behind furniture, or against heat sources which can disrupt airflow and humidity control.
Place the indoor unit where air can circulate freely and returns are unobstructed, avoiding heat sources and tight corners.
Can I install an air conditioner in a room that doesn’t have a window?
Windowless rooms can be cooled using ducted solutions connected to an outdoor condenser or a wall-mounted mini-split. A proper assessment by a technician is important to determine feasibility and required modifications.
You may need a ducted or mini-split solution; a professional can confirm what’s practical for your space.
Do I need permits for installing an air conditioner?
Permits depend on local regulations and the installation type. Central or rooftop systems often require electrical and structural approvals. Check with your local building department before starting.
Permits depend on your area and system type; consult the local building department to be sure.
How long does installation usually take?
Time varies by system type and home layout. Window units can be installed in a few hours, while central or ductless installations may take half a day to a full day with coordination of electrical and refrigerant work.
Expect several hours to a full day, depending on the system and home layout.
Is DIY installation safe or should I hire a pro?
Small window units and some portable models can be DIY-friendly. Central and ductless installations involve electrical work and refrigerant, so professional installation is recommended to ensure safety, performance, and warranty.
For central or ductless systems, hire a licensed technician to ensure safety and efficiency.
Watch Video
The Essentials
- Choose placement that maximizes airflow and minimizes sun exposure
- Ensure outdoor clearances and safe access for maintenance
- Decide between central, ductless, or window units based on space and needs
- Obtain permits and use licensed professionals when required
- Plan, measure, and test thoroughly to maximize efficiency and comfort