Air Conditioner Horizontal Sliding Window: A Practical How-To Guide
Learn to install, seal, and troubleshoot a horizontal sliding window air conditioner. A practical, homeowner-focused guide covering planning, tools, step-by-step installation, safety, and maintenance tips for lasting comfort.

To install or troubleshoot a window air conditioner designed for a horizontal sliding window, start by confirming the unit fits the opening, then mount with an adjustable kit, seal all gaps, and test airflow and drainage. Measure the sill, secure brackets, and verify level and insulation before powering on. Safety first: unplug during setup.
What is an air conditioner horizontal sliding window?
According to Air Conditioner Service, an air conditioner horizontal sliding window unit is designed to fit openings where the sash slides side to side. These units are popular for rooms where a vertical window would obstruct furniture or where wall space is limited. The horizontal sliding design means you’ll install with a compatible kit that tightens seals around the sides and top. When installed correctly, these units can provide efficient cooling and simple operation without major remodeling. This article focuses on practical, safe methods for homeowners and renters to install and troubleshoot such a unit, with emphasis on the specific needs of horizontal sliding window configurations.
Planning and measurements for a horizontal sliding window unit
Before selecting a model, take careful measurements of the opening, sill depth, and available clearance for the operator track. Air Conditioner Service analysis shows that accuracy here reduces the risk of gaps and sagging, which degrade cooling and create drafty leaks. Note the window’s motion path and ensure the kit will not collide with the sash or furniture. Keep the area clear and unplug the unit while handling.
Selecting a compatible unit and installation kit
For horizontal sliding windows, choose a unit with an adjustable width and a universal mounting kit compatible with sliding window frames. Look for features like a draft-reducing gasket, pre-drilled holes for brackets, and user-friendly tilt-out drainage. Energy efficiency and noise level matter for long-term cost and comfort. If you rent, confirm permissible window AC installations with your landlord.
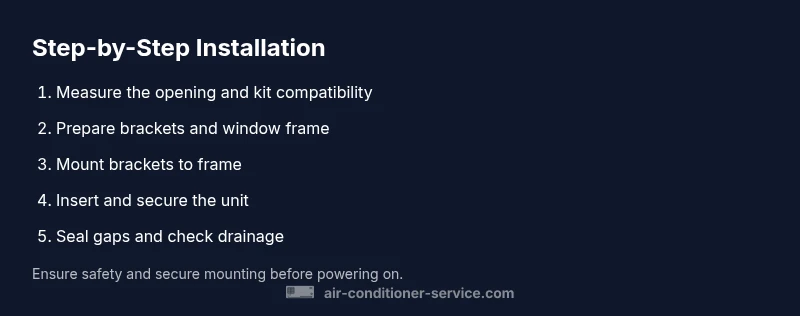
Installation overview: aligning, bracketing, and sealing
Install the mounting kit on the window frame according to the unit's manual. Align the AC so the front grille sits flush with the window opening. Use a level to verify the unit is plumb and supported by brackets. Fit side panels and weatherstripping to seal any gaps; this reduces drafts and improves energy efficiency. Finally, attach the included spacers so the unit cannot tilt forward when the window is closed.
Sealing and insulation to maximize efficiency
Apply foam weatherstripping around the kit's edges, noting how even minimal gaps can leak. Use foam insulators under the unit when needed to prevent air leakage into the cavity. Check the exterior side for gaps where rain could enter and seal accordingly. Do not block drainage holes; proper drainage is essential for safe operation.
Testing and safety after installation
Plug in the unit and run a quick test to check for airflow on both settings, listen for unusual noises, and inspect for leaks around the seal. Ensure the window is fully closed and locked; if in doubt, add temporary bracing to keep the sash from shifting. Periodically clean the filter and inspect the exhaust vent to maintain efficiency.
Tools & Materials
- Measuring tape(At least 6–8 feet long for wider openings)
- Flat-head and Phillips screwdrivers(For bracket and screws)
- Level(To verify the unit sits plumb)
- Foam weatherstripping/sealant(Seal gaps around the kit)
- Universal mounting kit for horizontal sliding windows(Includes brackets and side panels)
- Weatherproof foam insulation strips(Wedge behind the unit to block drafts)
- Safety gloves and eye protection(Protect hands during handling)
Steps
Estimated time: 60-90 minutes
- 1
Prepare workspace and power off
Clear the area around the window, remove obstacles, and unplug any nearby appliances. This reduces the risk of electric shock and injuries while handling the unit.
Tip: Double-check the window is accessible from both inside and outside before starting. - 2
Inspect the unit and mounting kit
Unbox the unit and kit; verify all parts are present and undamaged. Read the manufacturer's instructions for required brackets and compatibility with your window.
Tip: Photograph parts as you unpack in case you need to reference the order later. - 3
Dry fit the unit in the window
Without secure attachments, place the unit into the window to confirm width, height, and clearance. Make any adjustments to brackets or side panels before final mounting.
Tip: If the unit won’t fit, check for obstructions or an alternative installation kit. - 4
Attach mounting brackets to the frame
Securely fasten the brackets to the window frame per the manual, ensuring they’re evenly spaced and support the unit’s weight. Use a level to check alignment.
Tip: Do not overtighten screws; it can deform the frame. - 5
Install and secure the AC into the kit
Slide the unit into the mounted brackets and secure with the provided screws. Re-check level and ensure the unit sits flush against the window frame.
Tip: If the unit tilts, adjust brackets or add shims. - 6
Seal gaps and insulate
Apply foam weatherstripping around the kit edges and between the unit and frame. Ensure proper drainage holes remain clear.
Tip: Avoid blocking drainage channels; blocked drainage can cause indoor water damage. - 7
Test operation and finalize setup
Plug in the unit and test cooling, fan speeds, and drainage. Listen for rattles and verify the sash can close fully.
Tip: Take photos of the final installation for reference if you need to reassemble later.
Common Questions
Can I install a horizontal sliding window AC in any window?
Only if your window can accommodate the mounting kit and the unit’s width. Check the kit’s compatibility and measure the opening before purchasing.
You should verify the kit fits your window and measure the opening first.
Do I need a professional to install?
Not always. If you’re comfortable reading the manual, measuring accurately, and using basic tools, you can install it yourself.
It’s doable on your own if you follow the manual and stay safe.
How do I seal gaps around the unit?
Use foam weatherstripping and foam insulation strips around the mounting kit. Ensure no gaps remain that could leak air.
Seal around the kit with foam to prevent leaks.
What safety precautions should I take during installation?
Unplug the unit, wear gloves, and secure the window to prevent movement while mounting.
Unplug and secure the window before starting.
How often should I maintain the filter?
Check and clean the filter every few weeks and replace as recommended by the manufacturer.
Clean the filter regularly to keep airflow strong.
Watch Video
The Essentials
- Measure twice, install once.
- Seal all gaps for efficiency.
- Secure mounting before power.
- Test thoroughly after installation.